
Soffit lighting


I bought some slim LED Lights from Rona some time ago… they were on sale, and my intention was to install them on the outside of our garage in the soffits to offer some nice accent lighting on the outside of our house. The nice thing about these LED lights, is that they are very low power consumption (11 watts each) and offer a lot of lighting. It also serves two purposes; it can offer us more security around our home, as well as provide some nice accent lighting as I mentioned above.


However, I would need to be able to do fish some wire in from the garage attic, and if you read my last post, my garage attic was pretty filthy. It’s dark, dirty, and really hard to work in. Hard, because it’s low, and there are no real platforms to work on. You have to be very careful when working in the attic, because one false step, and your leg goes through the drywall. So you have to be careful to only step on the ceiling joists.
So with all that said, about a month ago, I was going to embark on this project. I stepped into the dirty, dark attic; and had no idea how I was going to get electrical wiring to the soffits. I thought that I would be able to access the soffits from within the attic itself, but it turns out you can’t (unless you fish wire through a drilled hole).
At least that’s what I thought at the time. Seeing as it was not very well lit, and hard to work in, I decided that it wasn’t worth my time.
Queue this past weekend, when I cleaned up the entire attic, and installed some lighting! Voila! Let there be light! Now that I had a clean area to work in, along with some lighting, I was able to find a channel where I could feed electrical wiring to the soffits, so I could provide electricity to each of the LED lights that I wanted to install.
I was able to then start on my work on the outside. I needed to get power from an existing light, so I was able to tap into power from one of the outside light sconces on the right side of the house. I was then able to fish the wire up to the attic, and then from the attic, through the channel that I found in the attic, and into the soffit.
Now that I had wiring in the soffit, I was able to begin work on cutting the holes for the lights. However, I had to make CERTAIN, that the electrical wire was accessible before I cut a 4.5″ diameter hole in my wooden soffits. So i drilled small 1/4″ hole and then stuck a cool endoscopic camera (which connects wirelessly to my phone) of which I can then use the camera to fish around in the hole to see if I can see the electrical wire. Low and behold, there it was! So I knew I was good to go now.
So here it is before. I just cut the hole for the first light as you can see on the right.


I didn’t have a jig saw or a hole saw, so I had to use my oscillating multi-tool to do the cutting of the circle. It was a bit of a pain, but it did the job.
I was able to fish electrical wire from this first hole then to the following 3 holes after, so that was pretty straight forward, and easy. Now, all I had to do was to wire it all up.


After they were all wired up, I popped them into the holes, and that’s all she wrote!
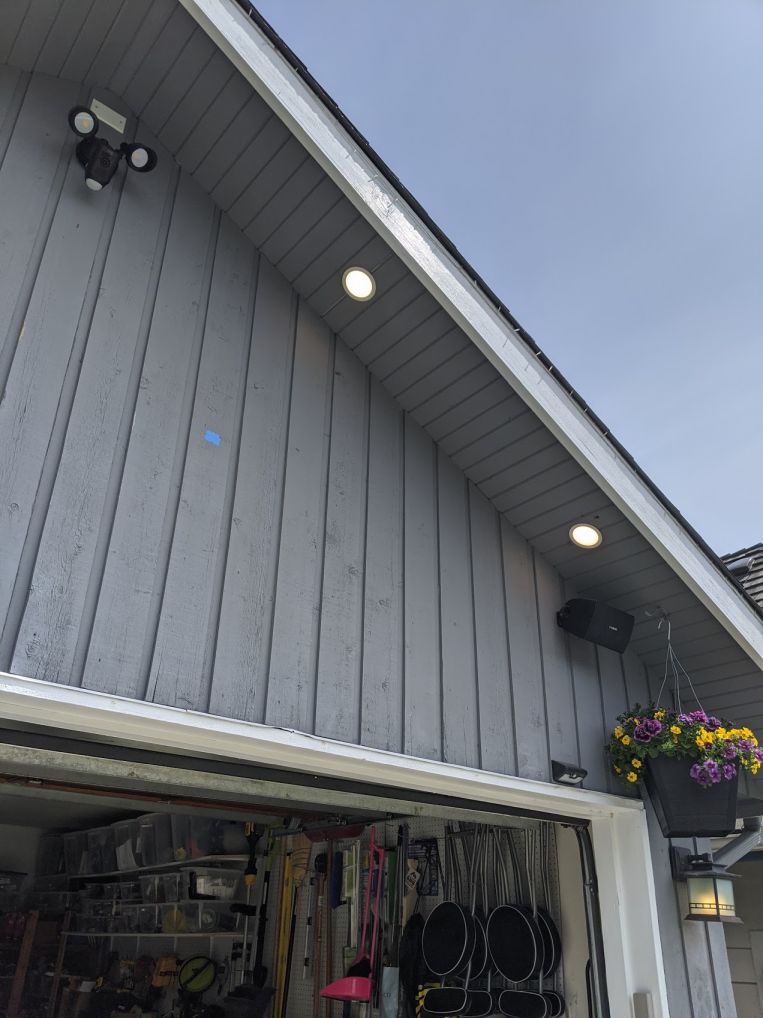


Not too shabby eh? Cost was also right. The cost of the romex cable (I already had a big spool from a previous project), along with lighting came to below $100! Pretty good deal, and a nice transformation if you ask me!